DIY Sesame Street 2nd Birthday Picnic

image

As you know, little O turned two this week.  I keep asking myself where the time has gone, but now even I am getting tired of the question.  Move on, Mares.  Move on.  OK.  So…I figured I would save my pontification for another piece and give you a good old, DIY post.

O’s birthday party was a laborious task only a mother would undertake.  Or, as in this case, two mothers.  Yes, we shared the celebration with O’s second cousin, Nora (born 2 days later).  Number one on the suggestion list is to co-host your celebration.  You cut the work (and cost) in half…and it’s so much more fun to share it all.  We had a head count of about 35 people.  Mostly adults.  So the menu reflected a more mature palate.  This was not a peanut butter and jelly crowd.  It was a picnic/cookout, but we wanted something a bit different.  So we went with a more sophisticated version of the traditional fare.  The menu was almost exclusively lifted from Pinterest..of course. We did a gourmet burger with guacamole, bratwursts, and a blue cheese coleslaw (that was out of this world, if I dare say so).  We made thematic tags for the food like Oscar the Grouch’s Gourmet Burgers, Sunny Days Slaw and Big Bird’s Brats.  We added some smaller sides, as suggested by the pin.  Here is the link for the menu.  We followed it pretty much to the tee and found it to be the perfect amount of food and drinks.

We served beer and wine and either bottled water or pink lemonade for the non alcoholic choice.  We set up a separate drink table and used a 3 gallon dispenser for the pink lemonade.  I then printed out a cut out of Abby Caddaby’s face from Pinterest, laminated it, and double stick taped it on the dispenser.  It was super cute!

image

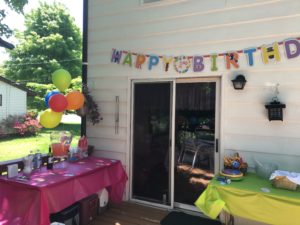
Decorations were pretty simple.  Balloons & Balloons. Different colored table covers (throw away). Different colored paper plates and napkins.  And a  Sesame Street Happy Birthday Banner from Party City.  Oh, and more balloons.  My cousin (Nora’s mother) made a party play list for the music, including the Sesame Street theme and oodles of happy, fun music, but not specifically children’s music.  It was a party for two children, but it wasn’t a children’s party, per say.

image


image

The dessert table was where I got creative with the Sesame Street theme. Of course, Elmo’s Goldfish were included.  And Abby Caddaby’s magic wands (chocolate dipped pretzel rods). Chocolate Chip cookies were served, as well as alphabet cookies and extra Cookie Monster fudge (more on that ahead).

image

image

image

image

Our Aunt Fil offered to get the cake which was a tremendous help.  So number two on the suggestion list…..when someone offers to bring something, say YES.  It could have said “Happy Retirement Sal” on it and it would have been great.  But as you can see, she kept with the Sesame theme beautifully!

image

I mentioned the Cookie Monster Fudge.  Again, Pinterest! Super cute.  Pretty easy.  And quite tasty.

image

I doubled the recipe and made enough to give as favors for the guests.  Found some small cellophane baggies at the dollar store and a cute Sesame Street pack of stickers ($ store) and used a label program on my computer to write the “Thank You so much for coming.  Love, Nora and Oliver.”  Soooo cute! Everything stuck to some construction paper squares, I punched some holes and used some ribbon.  Viola!

image

It was a really lovely day.  I dont recommend doing it yourself if you are the type who wants to relax and enjoy the party.  The whole time you are waiting on your guests, you are also running after a two year old…or at least trying to. Both sets of parents were wiped out by the time the last guest left around 8 or so. Like a truck ran over our bodies.  But it was lovely, nonetheless.  We held it at my parents home as it is so much closer to the bulk of the family on my side.  Maybe that’s why it reminded me so much of the picnics my Mom and Dad used to have summer after summer while we were growing up.  In a private moment of pause during the party I made my husband promise to remind me next year how hard it was so it would discourage me from wanting to do it again.  But, a lot like childbirth…you kind of forget the tough parts and remember the sweetness of it all.  Happy Happy Birthday my sweet O.  You have changed me for the better. Xoimage

Until next time, keep fighting the good fight and remember, behind every great kid is a mom who is pretty sure she is screwing it up! Thanks for reading! Xo


Deck The Yard With Pots of Holly

image

I don’t know about you, but I LOVE Christmastime.  I start listening to Christmas music in late October.  I shop mostly year round.  And after Thanksgiving I like to have decorations around the house so I can really enjoy them through the season.   I adore everything about this time of year.  As you know, I’ve been especially crafty this year.  Ever since we have moved into our new house, I fancy myself a sort of Martha Stewart meets Nigella meets Pioneer woman.  I’ve taken on some big projects in our home.  But the ones I have tackled for the holidays were all fun….and gave me much joy to accomplish.

I have shared my love of our yard.  But as the garden goes dormant, I was looking for something to fill my planter pots with that was festive and winter friendly.  Of course, Pinterest has some amazing planter ideas and how-tos.  I kind of melded several ideas together and came up with these…..

image

image

image

I literally walked around the property and found four different kind of evergreens, holly, pine cones and branches.  We have woods behind our house that go on and on…so finding these gems was not a stretch.  I pulled out the autumn mums I had in the pots, put some foam blocks for live floral arrangements on top of the soil and started arranging.    I don’t know how they will hold up in the New England snow….but for now, they are nice.

The second project I just finished yesterday, is a wreath for the birds.  In Martha’s November issue there is a picture of a simple balsam wreath with attached orange halves and pine cones slathered in peanut butter and rolled in bird seed.  It is so simple, but so nice.  I got a thing of green floral wire to attach the oranges (I used clementines) and pine cones to the wreath.  I added a festive red bow and I wound up with a sweet holiday accent for my yard and a party for the birds.

image

image

image

I’m loving all the creative things I can find to do for the holidays.  I’ve made gifts (though I can’t talk about them yet), pumpkin butters, fire starters, pine cone door hangers….hysterical.  I do wonder who the hell is in my body.  If you had told me 2 years ago that this would be me, I would have laughed and and thought YOU were crazy!

Also know, that not every project is a success.  I have many “misses.” Just ask my husband about my obsession with butternut squash.  Poor guy doesn’t need to see a butternut squash (or any squash for that matter) for a very long time.  Sometimes you succeed. Sometimes, not so much.  Either way, there is something really fufilling about creating something beautiful or something delicious.  Hmm…It’s a lot like motherhood.

Halloween 1 Mommy 0

image

Ok.  So we are safely into October.  There is a real chill in the air and the leaves are starting to appropriately turn color.  The 31st is literally around the corner and I am completely stumped as what to create for O’s costume.  Mind you, we don’t live around other homes, so I can’t imagine we will be getting trick or treaters.  And I suppose we could take O to a neighborhood around us, but it would really be an exercise in parents getting candy for themselves.  O doesn’t “get” Halloween yet, nor does he eat candy.  The idea of trapsing through the chilly evening, going up to the front doors of strange homes with him, saying “trick or treat!” for him, as he doesn’t talk yet, strikes me as odd.  It would be entirely for us.  So then why do it? And more specifically, why fret over a costume for him?

In my childhood household, Halloween was always a big holiday.  My mother was amazingly creative and untiring.  Making handmade costumes for all four of her children. My mom would go ALL OUT! We had a costume contest parade in our town and every year someone in our family would win, if not everyone! There were no store bought costumes for us. I remember choosing what we would like to be long in advance.  I remember my Mother sewing til the wee hours of the night getting everything just right.  One year I was a southern belle right out of Gone With The Wind with a full on hoop skirt dress!  I recall one of my brothers being a sheik one year and he actually pulled a huge stuffed camel after himself.  My Mother’s skill and creativity were truly amazing.

Somewhere the Halloween gene passed over me.  Even though I was lucky enough to wear the awesome costumes my mom made me, I’ve never been a huge fan of Halloween.  I mean, it’s not like it’s Christmas for G sake! I know,  there are people who go all out! They decorate their homes , work on costumes for months and go to local haunted houses.  Ugh.  Not this chick.  But now with O, do I have to get “into” it? Ok, maybe not THIS year, but certainly in the years to come?  The thing is, I already know I’m going to be horrible at it.  I will want him to pick the easy costume.  Something that will take the least amount of effort from me.  It’s awful! Even so, being raised on homemade costumes makes it very hard to take the easy road.

I know I could just go to the Halloween superstore and get something off the rack, but it seems so cheesy to me.  I remember as a kid feeling sorry for the kids who wore the store bought costumes.  How could I possibly put O in one?  And yet, how will I fair in making his dream of being a two headed dragon come true? I’ll be like, “Why don’t you be a hobo?”

It really is odd, because I am really a holiday person.  Hell, I shop for Christmas all year long.  I can’t wait to decorate right after Thanksgiving and I start listening to Christmas music in October (ooh, it’s coming up!) …don’t judge me.    It’s just the scary horror stuff just doesn’t do it for me.  The only thing I really like about Halloween is the abundance of candy, preferably Twix bars and anything Reese’s.  I suppose when O is actually is old enough to get excited about it and actually participate, my feelings may change.  I hope so.  I don’t want to be the lame Mom who couldn’t care less.  But this year, before he really knows….if I’m brutally honest, I could not care less and I kind of want to take the easy road.    I would love suggestions, cause I’m fresh out of ideas. Even Pinterest couldn’t help me.  Everything I saw on there looked too hard to do.  See, I’m pathetic.  Big Halloween Mommy fail.  Pass the candy bowl.

Until next time, keep fighting the good fight and remember, behind every great kid is a mom who is pretty sure she is messing it up.  Xo

Greetings From A Simple Farm Girl

image

There are days lately when I don’t recognize myself in this amazing life I have been blessed to live.  Things are so vastly different since the birth of my son.  I live in the country in a small town, for God sake! Not a designer boutique for over 50 miles.   I always used to tell my best friend jokingly that  I was “just a simple farm girl.”  It’s funny to me still…but maybe there is some truth in that.

Last week my projects consisted of re-upholstering our kitchen chairs and making/canning homemade raspberry preserves from our garden.  Both tasks were big successes.  Mind you, both projects were pretty easy.  But, I may just have a knack for this “Martha Stewart-ishness.”

Preserving and canning fruit is WAY easier than I ever thought.  I started small.  Just a couple cups of berries.  The recipe I found on Pinterest (of course) said equal parts sugar to berries.  But I have since reduced the sugar considerably.  Too sweet for me.  I did not use pectin.  Raspberry seeds release enough pectin to give your jam a nice jelled consistency.  And I didn’t have any.  So there.

You start by bringing your berries to boil on there own in a medium saucepan.  After about 10 minutes and regular stirring, you can add your desired amount of sugar.  And then you bring that to a boil again for about 10 minutes.

image

In the meantime take your glass jars and put them into a pot of water and bring to a boil.  You can do the same with the lids and rings in a separate smaller pot.

image

Once they have boiled, take them out carefully (these suckers are hot!) with a pair of good tongs.  I put mine on a cooling rack.  While they are still hot fill them with the hot jam.  Leave about a 1/4 inch at the top.  Put lid and ring on.  Not too too tight, but tight enough.  Place them back in the boiling pot of water.  I did mine for 10 minutes….but apparently if you live at a higher altitude you may need to leave them in a bit longer.  Then I took them out (with tongs) and place them on the rack to cool.  Several minutes later you will hear a popping sound as each jar seals….it’s pretty cool.

image

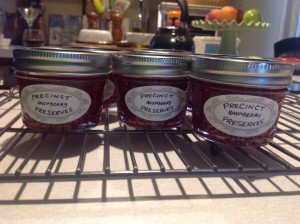
Then I made labels….nothing fancy.  Just handwritten.  They actually come with the jars…which actually came with our house. Previous owner must have been an avid canner…?  Anyway, here is my finished product! It tastes amazing! Sooo sooo good! And a fun little gift to give people when then come for dinner or a visit.

image


See….who am I?  Giving a “how to” on making preserves? Lol! I love it.  Couldn’t be happier!  I moved onto homemade peach pie (OMG!) and peach preserves are next! My favorite! Until next time, keep fighting the good fight and remember, behind every great kid is a Mom who is sure she is messing it up!


DIY Nautical 1st Birthday Bash


image

It is hard to believe it has been a year since I gave birth to my little O.  When I think back to the first few months of his life, it seems like a lifetime ago.  And I seem like a completely different person from that terrified, bluesy mommy of the early days of O’s life.  I have found my footing as a mother.  My tentative wobble has turned into a confident stride.  I can honestly say, I’m good at this mothering thing.  And I couldn’t be happier.  All of that,  along with the one year milestone for O, means there is MUCH to celebrate!  It seems appropriate to share some party tips I used  for my little ones first big day.

I chose to do a nautical theme, as I did with O’s nursery.  We have such a connection to the sea, especially now living here on the beautiful South Coast of Massachusetts.  I adore sailboats, shells, anything to do with the ocean.  If you live anywhere in the Northeast, you might be familiar with the Christmas Tree Shops.  They have a wonderful assortment of beach and nautical themed paper and party goods.  I got a lot of stuff from there.  But most all the food and baked goods were made by yours truly.  It is more time consuming than store bought, but I actually enjoy cake making and decorating, so it is worth the extra time it takes.

I decided to do a picnic/party, as most of the guests were adult relatives and it took place on Memorial Day weekend.  So the fare was pretty typical.  Hot dogs, hamburgers, potato salad, cole slaw, and baked beans.  It was the appetizers that I got to have a little fun with.  I can’t take credit for the idea of this red pepper crab, but I love it! Found it on Pinterest, of course.

Veggie and hummus tray with a red pepper crab critter for decoration!

Veggie and hummus tray with a red pepper crab critter for decoration!

I also wanted something a little more unique to add to your typical chips and salsa.  So I did a mix of goldfish crackers and pretzel nets.  Get it? Fish and nets?  Turned out very cute and there is nothing to it.  Just put them into cute little baskets lined with colorful napkins.

image

I also decided to use a beverage dispenser filled with lemonade and sliced lemons, rather than sodas.  Nothing worse than a bunch of 2 liter bottles or cans all over the place.  I used clear cups and added blue and green straws for a pop of color.  Again, super easy….but the theme and color scheme stay intact.  As far as decorations, I used light blue and aqua colored balloons and a nautical banner I got from Christmas Tree Shops.  I attached it to the drink/app table.  I thought of adding shells and starfish around the tables, but to be honest I forgot them at the last minute, but they would have been cute.

Drink & Appetizer table.  Banner is from The Christmas Tree Store.

Drink & Appetizer table. Banner is from The Christmas Tree Store.

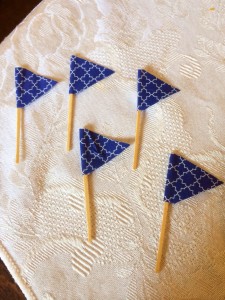
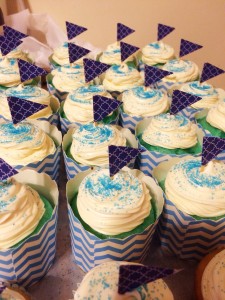
The real focal point was the dessert table that featured the Smash Cake and cupcakes, among other treats.  I added glass candy  jars of Swedish fish and blue, white, and green M&Ms.  I made the cake and cupcakes on my own.  Even the cupcake toppers.  I couldn’t find anything nautical that I liked, so I made little navy blue flags with toothpicks and colored masking tape. Unbelievably easy.

Dessert Table!

Dessert Table!

DIY cupcake picks! Nautical Flags!

DIY cupcake picks! Nautical Flags!

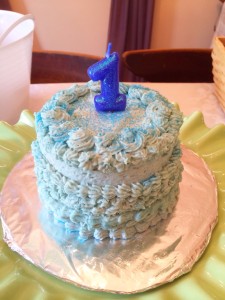
Now the Smash Cake is new to me. We didn’t have those things when I grew up, nor when my nieces and nephews had their first birthdays.  But, I kind of love the idea and the photos I’ve seen of other kids smashing into them are just dear.  To tell you the truth, I didn’t know how it would all go over.  O has never had sweets yet, so I wondered if he would even like it.  As it turns out, he wanted nothing to do with it.  No cute photos.  No face filled with icing.  It wasn’t his bag.  I can see where I went wrong.  The texture of the buttercream icing must have felt odd to him, as well as it being light blue.  It tasted GREAT to US….but that really isn’t the point of it.  I think I will try it a again on his actual birthday this week and use homemade whipped cream and Cheerios to top it.  He is familiar with Cheerios.  Lol.

The "un-smashed" Smash Cake!

The “un-smashed” Smash Cake!

The cupcakes were super yummy. I made two kinds. Blue Raspberry with a vanilla buttercream icing.  I found the cake cups in the Marshall’s Home Section.  Loved those! The second variety was vanilla with vanilla buttercream icing.  You really just need an icing bag and a good icing tip.  Again, Christmas Tree Shop has a box of 20 bags with 3 tips for $1.00.  Crazy, right?

Blue Raspberry Cupcakes with Vanilla Frosting

Blue Raspberry Cupcakes with Vanilla Frosting

We had such a nice day with my family in NJ.    I can’t tell you how thankful I am for all of them.  It’s so important for us to have O grow up with a sense of family, which is why we make the 4 hour trip as often as we do. We were exhausted at the end of the day, but it was all so worth it.  Thanks for letting me share and, as always, thanks for reading!!