Deck The Yard With Pots of Holly

image

I don’t know about you, but I LOVE Christmastime.  I start listening to Christmas music in late October.  I shop mostly year round.  And after Thanksgiving I like to have decorations around the house so I can really enjoy them through the season.   I adore everything about this time of year.  As you know, I’ve been especially crafty this year.  Ever since we have moved into our new house, I fancy myself a sort of Martha Stewart meets Nigella meets Pioneer woman.  I’ve taken on some big projects in our home.  But the ones I have tackled for the holidays were all fun….and gave me much joy to accomplish.

I have shared my love of our yard.  But as the garden goes dormant, I was looking for something to fill my planter pots with that was festive and winter friendly.  Of course, Pinterest has some amazing planter ideas and how-tos.  I kind of melded several ideas together and came up with these…..

image

image

image

I literally walked around the property and found four different kind of evergreens, holly, pine cones and branches.  We have woods behind our house that go on and on…so finding these gems was not a stretch.  I pulled out the autumn mums I had in the pots, put some foam blocks for live floral arrangements on top of the soil and started arranging.    I don’t know how they will hold up in the New England snow….but for now, they are nice.

The second project I just finished yesterday, is a wreath for the birds.  In Martha’s November issue there is a picture of a simple balsam wreath with attached orange halves and pine cones slathered in peanut butter and rolled in bird seed.  It is so simple, but so nice.  I got a thing of green floral wire to attach the oranges (I used clementines) and pine cones to the wreath.  I added a festive red bow and I wound up with a sweet holiday accent for my yard and a party for the birds.

image

image

image

I’m loving all the creative things I can find to do for the holidays.  I’ve made gifts (though I can’t talk about them yet), pumpkin butters, fire starters, pine cone door hangers….hysterical.  I do wonder who the hell is in my body.  If you had told me 2 years ago that this would be me, I would have laughed and and thought YOU were crazy!

Also know, that not every project is a success.  I have many “misses.” Just ask my husband about my obsession with butternut squash.  Poor guy doesn’t need to see a butternut squash (or any squash for that matter) for a very long time.  Sometimes you succeed. Sometimes, not so much.  Either way, there is something really fufilling about creating something beautiful or something delicious.  Hmm…It’s a lot like motherhood.
Greetings From A Simple Farm Girl

image

There are days lately when I don’t recognize myself in this amazing life I have been blessed to live.  Things are so vastly different since the birth of my son.  I live in the country in a small town, for God sake! Not a designer boutique for over 50 miles.   I always used to tell my best friend jokingly that  I was “just a simple farm girl.”  It’s funny to me still…but maybe there is some truth in that.

Last week my projects consisted of re-upholstering our kitchen chairs and making/canning homemade raspberry preserves from our garden.  Both tasks were big successes.  Mind you, both projects were pretty easy.  But, I may just have a knack for this “Martha Stewart-ishness.”

Preserving and canning fruit is WAY easier than I ever thought.  I started small.  Just a couple cups of berries.  The recipe I found on Pinterest (of course) said equal parts sugar to berries.  But I have since reduced the sugar considerably.  Too sweet for me.  I did not use pectin.  Raspberry seeds release enough pectin to give your jam a nice jelled consistency.  And I didn’t have any.  So there.

You start by bringing your berries to boil on there own in a medium saucepan.  After about 10 minutes and regular stirring, you can add your desired amount of sugar.  And then you bring that to a boil again for about 10 minutes.

image

In the meantime take your glass jars and put them into a pot of water and bring to a boil.  You can do the same with the lids and rings in a separate smaller pot.

image

Once they have boiled, take them out carefully (these suckers are hot!) with a pair of good tongs.  I put mine on a cooling rack.  While they are still hot fill them with the hot jam.  Leave about a 1/4 inch at the top.  Put lid and ring on.  Not too too tight, but tight enough.  Place them back in the boiling pot of water.  I did mine for 10 minutes….but apparently if you live at a higher altitude you may need to leave them in a bit longer.  Then I took them out (with tongs) and place them on the rack to cool.  Several minutes later you will hear a popping sound as each jar seals….it’s pretty cool.

image

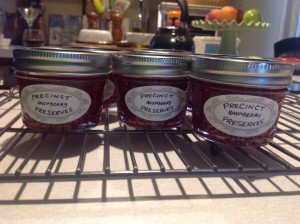
Then I made labels….nothing fancy.  Just handwritten.  They actually come with the jars…which actually came with our house. Previous owner must have been an avid canner…?  Anyway, here is my finished product! It tastes amazing! Sooo sooo good! And a fun little gift to give people when then come for dinner or a visit.

image


See….who am I?  Giving a “how to” on making preserves? Lol! I love it.  Couldn’t be happier!  I moved onto homemade peach pie (OMG!) and peach preserves are next! My favorite! Until next time, keep fighting the good fight and remember, behind every great kid is a Mom who is sure she is messing it up!